# Firmware Upgrade
The latest Replay Firmware can be downloaded from the GitHub Releases (opens new window) repo.
The zip contains two folders which correspond to the two different methods you can use to update your Replay's firmware. rAppUpdater for upgrades via SD Card and usbUpdater for (surprisingly) upgrading over USB.
To check your Replay's current firmware version, boot any core and bring up the OSD (F11). The current Firmware version is displayed on the first line after "ARM | FW:".
Note
If your Replay's existing firmware is very old or your Replay's bootloader has been corrupted, you may be unable to use either of these methods. All is not lost, instructions to recover will be added soon(tm).
# Upgrade via SD Card
If you have an SD Card setup with the "loader" core in the root. Then copy the rAppUpdater contents to a dated sub-directory.
Refer to the SD Card Setup section if you are unsure about how to organise your SD Card files.
/
├── background.raw
├── background_rgb.raw
├── replay.ini
├── replay_pal.ini
├── loader.bin
├── loop.pcm
├── Firmware/
│   ├── 20190616/
│   |   ├── rApp_NTSC_30FPS.ini
│   |   ├── rApp_NTSC_60FPS.ini
│   |   ├── rApp_PAL_25FPS.ini
│   |   ├── rApp_PAL_50FPS.ini
|   |   ├── bootrom.bin
|   |   ├── main.bin
|   |   ├── rApp_ARM.bin
|   |   ├── rApp_FPGA.bin
│   |   └── rApp_FPGA_FIXED_PAL_25FPS.bin
│   └── 20190518/
├── Amiga/
├── Pac-Man/
└── ...
Boot your Replay and load the appropriate rApp_*.ini file. Generally the rApp_NTSC_60FPS.ini or rApp_PAL_50FPS.ini is a good choice for DVI/HDMI connections.
After that, it is very much a case of following the on screen prompts.
The rAppUpdater will verify the checksum for all update files and prompt you to press "F" to flash the new firmware. The "Flashing" screen will then appear.
Take Care
Do NOT power off your device whilst firmware flashing is in progress. Doing so may render your device unbootable and require recovery using BOSSA (opens new window)
Once complete you will be prompted to press "R" to reboot the board. The board may fail to reboot after a successful flash, a power cycle will resolve that.
If any checksum fails to match you will be unable to start flashing the firmware. Should this occur, copy the rApp files to the SD card again. Make sure to safely remove/eject the SD card before physically disconnecting it from your computer. Removing without ejecting first may cause data loss or otherwise corrupt files. If this does not resolve the issue, download and extract the Firmware zip again.
Once firmware has successfully flashed, the rAppUpdater files are no longer required and may be deleted from the SD Card.
# Upgrade via USB
As an alternative to the rAppUpdater, you can flash new firmware over USB.
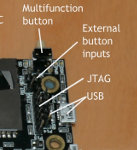
You will need to connect to either the micro usb socket, or, using a standard PC motherboard USB cable, to P14, the 5 header pins just to the right of SD Card socket.
Take Care
Take extreme care when using the micro usb socket. It is easy to break away from the board. We strongly recommend using the 5 USB header pins (P14) instead.
Upgrading over USB is quite straightforward.
- If the board is switched on, switch it off first (!)
- Connect a USB cable between board and PC (micro-usb or header P14)
- Windows users run replay_update.bat whilst Linux/MacOS users should run replay_update.sh
- When you see "No device connected, polling for it now...", hold the replay's multifunction button down and switch the board on
- The board will be detected (patience!) and flashing begin
- Release the menu button when you see the indicator dots '..'
- Wait until flashing is finished and this screen disappears
- The board will automatically reboot after a few seconds
