# Hardware
In order to use your Replay board you will need a few additional items:
Required:-
- Power Supply
- Video cable/adapters
- SD Card
- PS2 Compatible Keyboard
Recommended:-
- PS2 Mouse
- Controllers
- 3.5mm Audio cable/speakers
- Mini-itx case
Expansions:-
The mainboard is half size mini-ITX form factor. The base is 170 by 80 mm and the height is under 35 mm. It optionally comes with a standard ATX backplate. The board will fit in mostly any standard case on the market.
Whilst not required, an RS232 cable is useful for troubleshooting and a USB header cable will ensure you can recover from corrupted firmware.
# Power Supply
Take Care
Using an incorrect power supply may permanently damage your Replay board
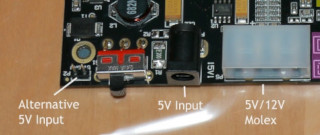
The board can be powered via either the 5V DC socket or a standard 4 pin Molex plug from an ATX power supply. Both sockets are located just to the right of the Power On/Off switch. With a maximum current draw of 700mA (3.5W), the board runs quite cool with no additional heat sink or fans required.

The 5V DC socket accepts a 2.1mm (5.5mm outer) center pin positive male plug supplying at least 1A.
To keep the board size down and also cost, there is no ATX power connector mounted. If you want to use an ATX power supply there is an adapter board sold separately by FPGA Arcade (EUR) (opens new window) and CBMStuff (US) (opens new window)
For small form factor builds a Pico PSU (opens new window) can be used in place of a standard ATX power supply.
Note
We recommend powering your board via the Molex socket, especially when the optional 68060 Daughter Board is attached.
# Video Cable
The replay provides several ways to connect to a display with the main connection via the rear DVI-I socket. Alternatives include a jamma expansion port and depending on your Replay board revision, SVHS and composite out.
Note
Audio over DVI/HDMI is not supported on the Replay 1. For audio output you will need to use the 3.5mm stereo socket or the jamma expansion port.
The DVI-I socket can be connected direct to a DVI compatible monitor or via a DVI/HDMI or DVI/VGA adapter.
Tip
Older hardware often used non-standard video signals. The VGA connections is more forgiving and will likely offer the widest range of monitor compatibility.
If you own a TV with Scart sockets, you may wish to run some cores at their native 15KHz video signal. Scart TVs will support a 15KHz signal and remove the need for for enabling the scanline doubler. Suitable VGA to Scart cables can be purchased from a variety of stores including amedia (opens new window).
A pin-out for building your own cable is available on the mist wiki (opens new window).
# RS232
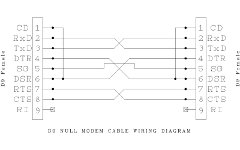
An RS232 connection is supported via a DE-9 null modem cable.

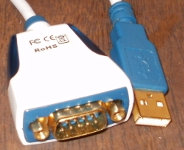
As most modern PCs do not include a serial port anymore, a USB/RS232 adapter is also suggested.

Numerous terminal applications can be used to to connect over the serial port such as Minicom.
Terminal settings are: 115200 baud, 8 data bits, 1 stop bits, no parity, flow control XON/XOFF (hardware flow off, software flow on).
Your terminal will display a wealth of boot and run time information that can be useful when diagnosing issues and reporting bugs. Keyboard passthrough also enables control of your Replay (to an extent) from the terminal.
# USB Header
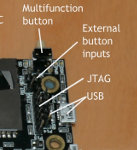
Just to the right of the SD Card slot and JTAG header is a 5 pin USB header (compatible with standard PC USB motherboard cables) and a micro USB socket. These allow flashing new firmware, updating the bootloader and also mounting your SD Card over USB.
Note, Pin 1 of the USB header is closest to the P14 label.

Take Care
Take extreme care when using the microusb socket. It is very easy to break away from the board. We strongly recommend using the 5 USB header pins (P14) instead.
# Controllers
The replay features two 9 pin (DE-9) joystick ports on the rear of board. These ports accept peripherals compatible with the widely used Atari joystick port (opens new window) found on the Atari 2600, Atari ST, Commodore 64, Amiga and Vic20.
Tip
Bluetooth controllers are not supported however it is possible to use the XBox One, PS3, PS4, wiimote and 8bitdo controllers with a DIY adatper

